[POST IN PROGRESS]
Please note that you shouldn’t modify your original Alice Router firmware provided by your ISP but, you could buy a new one on Ebay.
The router manufacturer is Pirelli and the firmware is released under GPL license.
A PDF with technical specifications is available.
Original Firmware Configuration
Technical details of the router are:
- Nome = Alice Gate VoIP
- Versione hardware = S1
- Versione globale = AGPF_4.3.5
- Versione boot loader = cfe-AGPF-10-0007
- Versione kernel = 2.6
- Versione drv ADSL = A2pB021.d17i
- Versione drv Wi-Fi = 4.150.10.5.cpe2.0
The target of the post is to install DD-WRT firmware or to be able to use the 2 x RJ11 ports with a SIP account.
Access to the original Pirelli webpage connecting to the following page:
http://192.168.1.1/admin.cgi?active%5fpage=730&user_name=admin&password=admin
Hardware Configuration
The detailed images of the PCB layer are available.
According to the PCB Layer of the router you could identify the following chips:
-
BroadCom BCM6358KFBG = CPU
-
LinkCom LAL0683 0821G = ADSL 2+ modem
-
NANYA NT5DS16M16CS-5T = 256Mb DDR SDRAM
-
SPANSION S29GL128P = Flash 16 MByte
-
BROADCOM BCM94318MPG = 802.11b/g Transceiver with BroadRange Technology
Upgrade firmware
The full specification of the HW and chips are available at OpenWRT Docs
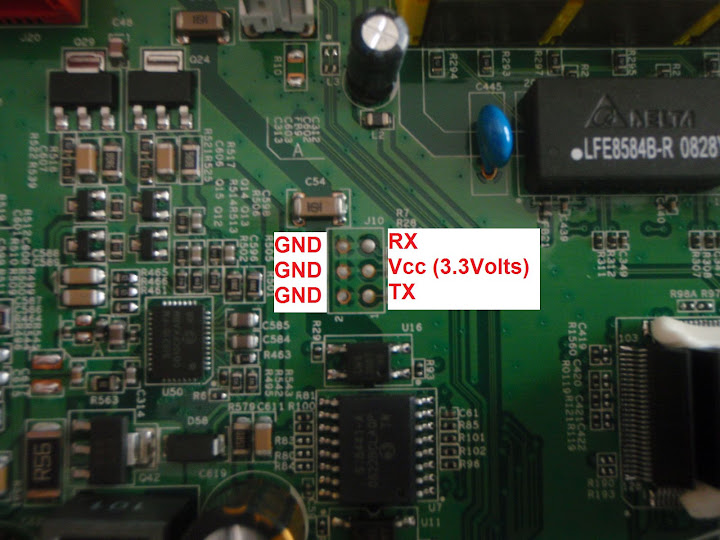
J10 is a connector for a RS232 serial port with the following pinout:
6 = GND 5 = RX
4 = GND 3 = Vcc (3.3 Volts)
2 = GND 1 = TX
Connect pin 1 and 5 to activate the upload webpage to send new firmware to the router with the RED power supply LED: http://192.168.1.1/
The OpenWRT firmware is available to install on this router.
All firmware files are available at Darviniano website.
Enable admin.html page
Save the configuration file from this page:
http://192.168.1.1/admin.cgi?active%5fpage=9167&user_name=admin&password=admin
and enable Telnet changing the following line:
(telnets
(disabled(0))
- Open CMD –> TELNET –> OPEN 192.168.1.1
- Username: admin
- Password: admin
- Enable admin.html webpage with the following commands:
Discus> conf set /wbm/admin_on 1
Discus> conf reconf 1
Discus> system reboot - Enable VOIP line
Discus> conf set /voip/line/0/enabled 1
Discus> conf set /voip/line/1/enabled 1
Discus> conf reconf 1 - Enable advanced menu
Discus> conf set /wbm/X_TELECOMITALIA_IT_lan_option biz-rt-napt
Discus> conf set /wbm/X_TELECOMITALIA_IT_conn_mode Bridged+Routed
Discus> conf reconf 1 - Disable remote management by Telecom =
Discus> conf set /dev/ppp0/enabled 0
Discus> conf set /cwmp/enabled 0
Discus> conf reconf 1
Change WiFi settings
To change the Wireless SID and WPA password, follow these steps:
- Access the “Quick Setup” webpage =
http://192.168.1.1/admin.cgi?active%5fpage=9160&user_name=admin&password=admin - In the “Wireless” section, change Wireless Network (SSID) and Pre-Shared Key fields
Change Voice over IP settings
To change the Wireless SID and WPA password, follow these steps:
- Access the “Voice over IP” webpage =
http://192.168.1.1/admin.cgi?active%5fpage=9095&user_name=admin&password=admin - In the “Advanced” tab, check these values:
[Signaling Protocol]
Local SIP Port: 5060
Use Strict SIP Message Checking = enable
Enable transparent SIP Mode = enable
Enable Server look-up = disable
Enable Sip on Interface:[RTP]
Local RTP Port Range – Contiguous Series of 494 Ports Starting From: 49648[Quality of Service]
Type Of Service (Hex): 0xa0[Codecs]
G.729, 8kbps = enable 20
G.711, 64kbps, A-Law = enable 20
G.711, 64kbps, u-Law = enable 20
G.723, 5.3/6.3kbps = disable 20
G.726-32, 32kbps = disable 30[Silence Suppression]
Enable Silence Suppression = disable
Enable Comfort Noise = disable[Echo Cancellation]
Enable Echo Cancellation = enable[DSP Country]
DSP Country: Italy
- In the “Line Settings” tab, check these values for each line:
-
- Line Number: 1
User ID: {YourVoipUsername}
Block Caller ID = disable
Display Name: Line 1- [Services]
Enable Call Waiting = enable
Enable 3-Way Calling = enable
Enable Message Waiting Indication = disable
Enable Do Not Disturb = disable
Enable Call Forwarding Always = disable
Enable Call Forwarding on Busy = disable
Enable Call Forwarding on No Answer = disable- [SIP Account]
Authentication User Name: {YourVoipUsername}
Authentication Password: {YourVoipPassword}- [SIP Proxy]
Use SIP Proxy = enable
Host Name or Address: {sip.YourVoipProvider.com}
Port: 5060
Register with Proxy = enable
Register Expires: 3600 seconds
Use Proxy Address as User Agent Domain = enable- [Outbound Proxy]
Use Outbound Proxy = enable
Host Name or Address: {sip.YourVoipProvider.com}
Port: 5060- [Fax Transmission]
Fax Transmission Method: None- [Numbering Plan]
Minimum Number of Digits: 1
Maximum Number of Digits: 40
Inter-Digit Timer: 3000 milliseconds- [Prefixes]
-empty list-- [Advanced SIP Settings]
DTMF Transmission Method: Out-of-Band by Negotiation (RFC2833)
Compatibility Mode: OffIn case of “Proxy unreachable” check the System Log at this page:
http://192.168.1.1/admin.cgi?active%5fpage=9091&user_name=admin&password=adminIf you find any releated Asterisk errors, reboot the router.
- Line Number: 1
Structure of Discus.conf file
There are a lot of sections in the structure of the Discus.conf file.
Download it from this webpage:
http://192.168.1.1/admin.cgi?active%5fpage=9167&user_name=admin&password=admin
The sections are:
- dev
- admin
- system
- wbm
- syslog
- dns
- disk
- fs
- print_server
- service
- fw
- rip
- mcast
- rmt_udp
- voip
- enotify
- radius
- cwmp
- manufacturer
- cert
- ssh
- upnp
- pppoe_relay
- qos
- network
- internal
- ddns
Guide to unlock the router =

I recently came across your blog and have been reading along. I thought I would leave my first comment. I don’t know what to say except that I have enjoyed reading. Nice blog. I will keep visiting this blog very often.Ruthhttp://systemmemory.info
LikeLike
Ciao, ho letto attentamente il tuo blog ma non riesco a sloccare il router per utilizzarlo con altri provider. Come posso fare? Esiste una configurazione già pronta da qualche parte da poter utilizzare direttamente?Grazie! :)albix
LikeLike
Ciao Albix,ci sto ancora lavorando per far funzionare una connessione PPPoA (per capirci, ADSL di Tiscali) con il router Alice.Di default utilizza PPPoE con bridge.Ho provato a rimuovere tutto il ramo IPTV e PPPoE, aggiungere PPPoA con il wizard, ma nei log riporta un errore di “default bridge non configurato” quindi manca ancora un passo per far parlare LAN+WIFI e PPPoA! :-)Ciao.
LikeLike
ciao lele ho un problema con la registrazione dell'opratore voip…mi sembra di aver seguito tutto scrupolosamente ma niente da fare mi dice proxy unreacheable…..questo è il log di errore dice che non riesce a raggiungere woiceup.com che sarebbe il server sip del mio operatore….Dec 1 01:04:37 2008 System Log Message user.warn asterisk[761]: VERBOSE[761]: Failed to load configuration file. Module not activated.Dec 1 01:04:37 2008 System Log Message user.warn asterisk[761]: VERBOSE[761]: Unable to lookup 'woiceup.com'Dec 1 01:04:22 2008 System Log Message user.warn asterisk[761]: VERBOSE[761]: Unable to locate host 'woiceup.com'Dec 1 01:04:22 2008 System Log Message user.warn asterisk[761]: VERBOSE[761]: Unable to lookup 'woiceup.com'Dec 1 01:04:07 2008 System Log Message user.warn asterisk[768]: VERBOSE[768]: Manager 'manager' logged on from 127.0.0.1Dec 1 01:04:07 2008 System Log Message user.warn asterisk[761]: VERBOSE[761]: No music on hold classes configured, disabling music on hold.Dec 1 01:04:07 2008 System Log Message user.warn asterisk[761]: VERBOSE[761]: CDR simple logging enabled.
LikeLike
Ciao milejo,sicuro che il server non è "sip.woiceup.com".Dal sito sembrerebbe di no:http://woiceup.com/software.htmlPerò dal primo evento mi sa che c'è un errore nel file di configurazione:System Log Message user.warn asterisk[761]: VERBOSE[761]: Failed to load configuration file. Module not activated.Prova a non modificare manualmente il file .conf ma utilizza interfaccia grafica in modo che sia lo stesso router a modificare il file in maniera corretta.Ciao e Buona giornata.
LikeLike
ciao in realtà ho modificato direttamente da interfaccia non ho modificato il file conf….il telecontrollo è ora disattivato ed era stato disattivato prima di creare il profilo voip…è tutto corretto???perchè mi sembra strano che nel log c'è scritto unable to lookup woiceup.com….. La porta è la classica 5060 quindi non vedo dove sia l'errore…ho provato a mettere il server proxy di eutelia ma mi da lo stesso errore. Inoltre l'indirizzo è corretto woiceup.com perchè ho tre account che uso regolarmente e quindi sono sicuro che il proxy sia corretto.
LikeLike
forse ho scoperto il problema…non è che se ho abilitato la modalita bridged + routed mi disabilita voip e wifi??? Inoltre in network connection sotto la voce bridged mi dice: Waiting for Underlying Connection (WAN ETHoA – Connected).cosa significa?
LikeLike
qualche novità? x questo modem? ho fatto tutto x filo e x segno… ma nulla nn riesco a farlo connettere in automatico… devo sempre farlo manualmente.saluti
LikeLike
Ciao, ho a casa mia l' Alice Gate VoIP 2 Plus Wi-Fi AGPF_4.5.0 ricevuto da un mio collega.Ho qua da me ADSL della Tiscali. La domanda é se posso usare in qualche maniera l' Alice Gate anche per la Tiscali. L' Alice Gate che sta qua da me ha anche gia quel menu avanzato (Printserver, Samba,…) attivo. Che possibilitá ho in questo caso? (OpenWRT?). Ti sarrei molto grato se mi potresti dare qualche indizio – se no butto questo modem/router via.saluti
LikeLike
ciao a tutti,per il momento non sono ancora riuscito a modificarlo per l'ADSL PPPoA, ovvero lo standard utilizzato da Tiscali.o meglio, c'è l'opzione interna per impostarla, ma poi non riesce ad interfacciarsi con il server.ciao.
LikeLike
Ciao…Ho un problema…voip attivato da Discus.conf, ma nella Line Settings del menu Voice Over IP non appare proprio nulla, così non posso aggiungere i dati del mio provider VoIP…A cosa può essere dovuto???Grazie mille e auguri!!!!
LikeLike
Ciao,devi prima creare le linee e poi configurarle.Enable VOIP lineDiscus> conf set /voip/line/0/enabled 1Discus> conf set /voip/line/1/enabled 1Discus> conf reconf 1Ciao e Auguri anche a te! 🙂
LikeLike
ciao…vedo che sai bene come è fatto questo modello… ho gia scritto un topic con la richiesta di spiegazioni qui: http://www.ilpuntotecnicoeadsl.com/forum/index.php/topic,10734.msg82527.html#msg82527puoi leggere per vedere se puoi darmi una mano? grazie in anticipo…
LikeLike
Salve scusate ma non riesco a trovare il software sostitutivo, potreste mettere un link più chiaroGrazie!
LikeLike
ciaoho sbloccato anche io il mio AGPF.E si collega con il pppoa a tiscali.Il problema pare a questo punto quello di nattare la rete interna. Non so come impostare il nat… se solo ci fosse un bel iptables e un ip_forwarding… C'è qualche guida a proposito? C'è un manuale ufficiale del software di questo router?Provare a chiedere a pirelli?
LikeLike
Ciao Lele,I live in Italy but I am not too strong in italian so my question is in english:By doing the firmware upgrade could I tune the signal power of the WiFi antenna? I mean I need to connect 2 buildings and Alice can not produce strong enough signal. I read about free source coded firmwares that sometimes it is the solution. (Can tune from 28mW to 100mW for example) In case of Alice Gate VoIP 2 Plus Wi-Fi is it so?2nd question: you mentioned we should not change the firmware on branded device. Should we save the original firmware? Unfortunatelly as far as I saw we need to open up the box so loosing the guarantee…Grazie mille!Stefano
LikeLike
Ciao lele, ottimo paper, anche io smanetto da parecchio oramai con questo apparecchio. Ora sto tentando di mettere OpenWRT. Il problema è che l'interfaccia di caricamento web del firmware (quella della discus console) mi dice che l'immagine è danneggiata.C'è un modo di effettuare questa operazione senza ricorrere al JTAG ?Grazie
LikeLike
Ho eseguito le istruzioni e configurato il server proxy di poivy. La linea 1 si registra correttamente (Status Registered) ma al tentativo di chiamata ricevo il tono di occupato. Da notare che, disabilitando la linea 1 ed eseguendo la registrazione in wifi con un cellulare, riesco ad eseguire correttamente le chiamate, non dovrebbero quindi esserci problemi di firewall. Qualche suggerimento, grazie.
LikeLike
Ragazzi miei è tecnicamente bello il tentativo, ci sto provando ank'io … intanto xò x ki fosse meno interessato alla tecnica e d+ a risparmiare soldini spieghiamo anke il concetto dello "switch wireless": se avete fatto un contratto con la discreta ma costosissima linea Alice di Telecom Italia e stanchi di pagare 80 o 90 euro a bimestre avete cambiato per un gestore che non Vi offre l'apparecchio, NON E' NECESSARIO KE VI ACCOLLIATE LA SPESA DI UN NUOVO COSTOSISSIMO MODEM ROUTER WIRELESS (!!!) comprate un normalissimo ed economicissimo modem router ethernet qualsiasi (io ho optato x il Trust 16655, xkè a 19,90 euro da sme) collegatelo al pc e assicuratevi che il suo idirizzo IP sia diverso da 192.168.1.1 (io il Trust l'ho settato a 192.168.0.1) inserite tutti i parametri della vostra connessione collegate il cavetto telefonico e verificate che navighi. Ora staccatelo dal computer e collegatelo a una qualsiasi delle 4porte ethernet dietro al vostro alice gate, assicuratevi all'indirizzo 192.168.1.1 che il wireless dell'alice gate sia acceso. Se i vostri computer hanno l'ip e i dns in automatico avete già ripristinato la connessione internet per la vostra rete di pc 😉 Diversamente provvedete a settarli. Krys
LikeLike
Lele,ma con questo router il chip della ADSL è supportato in openWRT? Perché in giro si leggono voci discordanti.
LikeLike
Howdy just wanted to give you a quick heads up. The text in your post seem to be running off the screen in Firefox. I’m not sure if this is a formatting issue or something to do with internet browser compatibility but I figured I’d post to let you know. The layout look great though! Hope you get the problem fixed soon. Kudos Drop by my site whenever you want. =D..!
LikeLike