[POST IN PROGRESS]
Please note that you shouldn’t modify your original Alice Router firmware provided by your ISP but, you could buy a new one on Ebay.
The router manufacturer is Pirelli and the firmware is released under GPL license.
A PDF with technical specifications is available.
Original Firmware Configuration
Technical details of the router are:
- Nome = Alice Gate VoIP
- Versione hardware = S1
- Versione globale = AGPF_4.3.5
- Versione boot loader = cfe-AGPF-10-0007
- Versione kernel = 2.6
- Versione drv ADSL = A2pB021.d17i
- Versione drv Wi-Fi = 4.150.10.5.cpe2.0
The target of the post is to install DD-WRT firmware or to be able to use the 2 x RJ11 ports with a SIP account.
Access to the original Pirelli webpage connecting to the following page:
http://192.168.1.1/admin.cgi?active%5fpage=730&user_name=admin&password=admin
Hardware Configuration
The detailed images of the PCB layer are available.
According to the PCB Layer of the router you could identify the following chips:
-
-
LinkCom
LAL0683 0821G = ADSL 2+ modem
-
-
-
BROADCOM
BCM94318MPG = 802.11b/g Transceiver with BroadRange Technology
Upgrade firmware
The full specification of the HW and chips are available at OpenWRT Docs
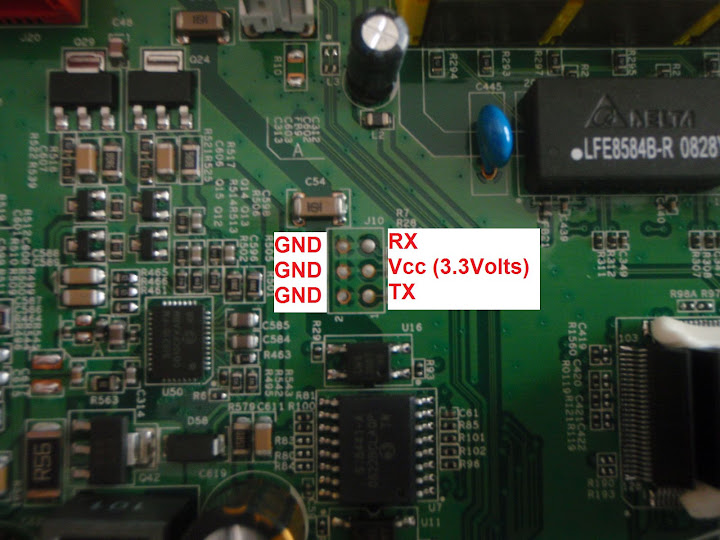
J10 is a connector for a RS232 serial port with the following pinout:
6 = GND 5 = RX
4 = GND 3 = Vcc (3.3 Volts)
2 = GND 1 = TX
Connect pin 1 and 5 to activate the upload webpage to send new firmware to the router with the RED power supply LED: http://192.168.1.1/
The OpenWRT firmware is available to install on this router.
All firmware files are available at Darviniano website.
Enable admin.html page
Save the configuration file from this page:
http://192.168.1.1/admin.cgi?active%5fpage=9167&user_name=admin&password=admin
and enable Telnet changing the following line:
(telnets
(disabled(0))
- Open CMD –> TELNET –> OPEN 192.168.1.1
- Username: admin
- Password: admin
- Enable admin.html webpage with the following commands:
Discus> conf set /wbm/admin_on 1
Discus> conf reconf 1
Discus> system reboot
- Enable VOIP line
Discus> conf set /voip/line/0/enabled 1
Discus> conf set /voip/line/1/enabled 1
Discus> conf reconf 1
- Enable advanced menu
Discus> conf set /wbm/X_TELECOMITALIA_IT_lan_option biz-rt-napt
Discus> conf set /wbm/X_TELECOMITALIA_IT_conn_mode Bridged+Routed
Discus> conf reconf 1
- Disable remote management by Telecom =
Discus> conf set /dev/ppp0/enabled 0
Discus> conf set /cwmp/enabled 0
Discus> conf reconf 1
Change WiFi settings
To change the Wireless SID and WPA password, follow these steps:
Change Voice over IP settings
To change the Wireless SID and WPA password, follow these steps:
[Signaling Protocol]
Local SIP Port: 5060
Use Strict SIP Message Checking = enable
Enable transparent SIP Mode = enable
Enable Server look-up = disable
Enable Sip on Interface:
[RTP]
Local RTP Port Range – Contiguous Series of 494 Ports Starting From: 49648
[Quality of Service]
Type Of Service (Hex): 0xa0
[Codecs]
G.729, 8kbps = enable 20
G.711, 64kbps, A-Law = enable 20
G.711, 64kbps, u-Law = enable 20
G.723, 5.3/6.3kbps = disable 20
G.726-32, 32kbps = disable 30
[Silence Suppression]
Enable Silence Suppression = disable
Enable Comfort Noise = disable
[Echo Cancellation]
Enable Echo Cancellation = enable
[DSP Country]
DSP Country: Italy
- In the “Line Settings” tab, check these values for each line:
-
- Line Number: 1
User ID: {YourVoipUsername}
Block Caller ID = disable
Display Name: Line 1
- [Services]
Enable Call Waiting = enable
Enable 3-Way Calling = enable
Enable Message Waiting Indication = disable
Enable Do Not Disturb = disable
Enable Call Forwarding Always = disable
Enable Call Forwarding on Busy = disable
Enable Call Forwarding on No Answer = disable
- [SIP Account]
Authentication User Name: {YourVoipUsername}
Authentication Password: {YourVoipPassword}
- [SIP Proxy]
Use SIP Proxy = enable
Host Name or Address: {sip.YourVoipProvider.com}
Port: 5060
Register with Proxy = enable
Register Expires: 3600 seconds
Use Proxy Address as User Agent Domain = enable
- [Outbound Proxy]
Use Outbound Proxy = enable
Host Name or Address: {sip.YourVoipProvider.com}
Port: 5060
- [Fax Transmission]
Fax Transmission Method: None
- [Numbering Plan]
Minimum Number of Digits: 1
Maximum Number of Digits: 40
Inter-Digit Timer: 3000 milliseconds
- [Prefixes]
-empty list-
- [Advanced SIP Settings]
DTMF Transmission Method: Out-of-Band by Negotiation (RFC2833)
Compatibility Mode: Off
In case of “Proxy unreachable” check the System Log at this page:
http://192.168.1.1/admin.cgi?active%5fpage=9091&user_name=admin&password=admin
If you find any releated Asterisk errors, reboot the router.
Structure of Discus.conf file
There are a lot of sections in the structure of the Discus.conf file.
Download it from this webpage:
http://192.168.1.1/admin.cgi?active%5fpage=9167&user_name=admin&password=admin
The sections are:
- dev
- admin
- system
- wbm
- syslog
- dns
- disk
- fs
- print_server
- service
- fw
- rip
- mcast
- rmt_udp
- voip
- enotify
- email
- radius
- cwmp
- manufacturer
- cert
- ssh
- upnp
- pppoe_relay
- qos
- network
- internal
- ddns
Guide to unlock the router =